1. Introduction – Can Cherry Pits Really Grow into Trees
Many gardeners wonder if cherry pits thrown away after eating fruit can actually grow into trees. This curiosity has inspired countless home gardening experiments. Cherry trees belong to the stone fruit family, and their seeds are surprisingly resilient. With proper treatment, cherry pits can sprout and develop into healthy saplings. However, success depends on patience and correct preparation. Many beginners fail due to skipping essential steps. Understanding the process helps set realistic expectations. Growing from pits is slow but rewarding.
2. Understanding Stone Fruits and Seed Viability
Cherry pits are hard-coated seeds designed to survive harsh conditions. In nature, they endure winter before germinating in spring. This dormancy protects the embryo from sprouting at the wrong time. Not all cherry pits are viable, especially from store-bought fruit. Hybrid varieties may not produce true-to-type trees. Still, most pits can germinate with proper stratification. Knowing this helps gardeners avoid disappointment. Seed viability varies by fruit quality and freshness.
3. Fresh vs Store-Bought Cherry Pits
Fresh cherries from local trees often give better germination results. Store-bought cherries may be treated or stored in cold conditions that reduce seed viability. However, many gardeners still succeed using supermarket cherries. Organic cherries are usually a better option. Fresh pits contain higher moisture and active embryos. Regardless of source, pits must be cleaned thoroughly. Removing fruit flesh prevents mold formation. Clean pits are the foundation of success.
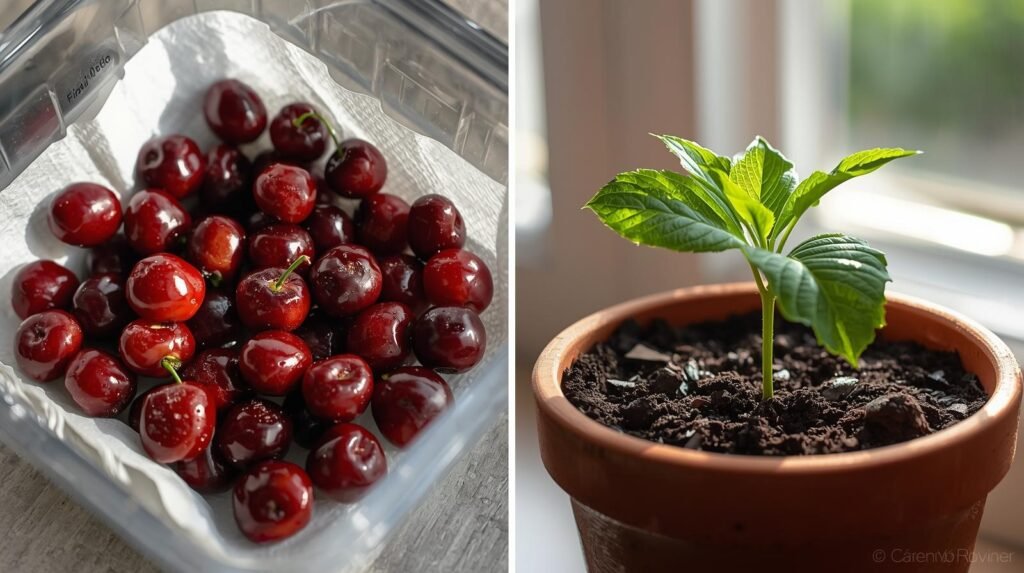
4. Cleaning and Preparing Cherry Pits
After eating cherries, pits should be washed under running water. All remaining pulp must be removed completely. Sticky residue can cause fungal growth during storage. Clean pits should be air-dried for one day. Avoid sun-drying as it may damage the embryo. Proper cleaning reduces disease risk. This step is often overlooked by beginners. Clean preparation improves germination chances significantly.
5. The Importance of Cold Stratification
Cherry pits require cold stratification to break dormancy. This mimics winter conditions found in nature. Without stratification, pits may not sprout at all. Cold exposure activates internal growth hormones. Stratification usually lasts eight to twelve weeks. This process prepares seeds for spring growth. Skipping this step is a common mistake. Proper stratification dramatically increases success rates.
6. How to Stratify Cherry Pits at Home
Cherry pits can be stratified using a refrigerator. Place pits in a damp paper towel or moist sand. Seal them in a breathable container or plastic bag with holes. Store them in the refrigerator vegetable drawer. Check moisture weekly to prevent drying. Moldy pits should be discarded immediately. Consistent cold conditions are essential. After weeks, pits may crack naturally.
7. Signs That Cherry Pits Are Ready to Plant
Once stratification is complete, pits show signs of readiness. Some pits develop small cracks or root tips. This indicates the embryo is active. Even uncracked pits can still germinate. Timing is important for planting. Early spring is ideal for sowing. Healthy pits feel firm and heavy. Any soft or moldy pits should be removed. Good selection improves outcomes.
8. Choosing the Right Soil for Germination
Well-draining soil is critical for cherry seed germination. Heavy soil retains water and causes rot. A mix of garden soil, sand, and compost works best. Potting soil alone may hold too much moisture. Soil should be loose and airy. Good drainage encourages root development. Soil quality affects early growth strength. Healthy soil equals healthy seedlings.
9. Planting Cherry Pits in Containers
Cherry pits should be planted about one inch deep. Containers must have drainage holes. Plant one pit per pot to avoid root competition. Water gently after planting. Soil should be moist but not soggy. Label pots to track planting dates. Place containers in a warm location. Consistency is key during this stage.
10. Germination Time and What to Expect
Cherry seeds germinate slowly compared to vegetables. Sprouting may take several weeks to months. Patience is essential. Some pits sprout earlier than others. Consistent moisture and warmth encourage growth. Avoid overwatering during waiting periods. No visible growth does not mean failure. Cherry seeds operate on their own timeline.
11. Caring for Cherry Seedlings Indoors
Once seedlings emerge, they need bright indirect light. Direct sunlight can scorch young leaves. Water only when the soil surface feels dry. Overwatering causes root rot. Rotate pots for even growth. Seedlings grow slowly during early stages. Gentle care ensures strong development. Healthy seedlings are worth the wait.
12. When and How to Transplant Seedlings
Seedlings should be transplanted once they develop multiple leaves. Roots should be strong but not overcrowded. Transplant into larger pots carefully. Avoid damaging delicate roots. Use fresh, nutrient-rich soil. Water lightly after transplanting. Gradual transition reduces shock. Healthy transplants adapt better.
13. Outdoor Hardening Process
Before moving outdoors, seedlings must be hardened off. This involves gradual exposure to outdoor conditions. Start with one hour of sunlight daily. Increase exposure over one to two weeks. This prevents shock and leaf burn. Hardening strengthens plant structure. Sudden outdoor placement can kill seedlings. Slow transition ensures survival.
14. Planting Cherry Trees in the Ground
Choose a sunny, well-drained location. Cherry trees require full sunlight for fruiting. Dig a hole twice the root width. Plant at the same depth as the pot. Firm soil gently around roots. Water thoroughly after planting. Mulch helps retain moisture. Proper planting ensures long-term health.
15. Growth Timeline and Fruit Expectations
Cherry trees grown from seed take time to mature. Fruiting may take five to seven years. Seed-grown trees vary in fruit quality. Some may produce small or sour fruit. Others may surprise with good harvests. Growth rate depends on care and climate. Patience rewards dedicated gardeners.
16. Common Problems and Solutions
Seedlings may suffer from damping-off disease. Overwatering is the main cause. Poor drainage leads to root rot. Pests are rare at early stages. Yellowing leaves indicate nutrient deficiency. Proper care prevents most issues. Early intervention saves plants. Observation is key.
17. Benefits of Growing Cherries from Seed
Growing from seed is educational and rewarding. It costs almost nothing. Gardeners learn patience and plant biology. Trees grown from seed adapt well locally. They often develop strong root systems. It’s ideal for hobby gardeners. The experience itself is valuable.
18. Limitations of Seed-Grown Cherry Trees
Seed-grown trees are unpredictable. Fruit quality cannot be guaranteed. Trees take longer to fruit. Commercial orchards prefer grafted trees. Seed-grown trees are best for learning. Expectations must be realistic. Understanding limitations avoids disappointment.
19. GrowWithJessie Style Experiment Mindset
Experimentation is at the heart of gardening. Trying cherry pits is a fun project. Success varies, but learning is guaranteed. Gardening content thrives on honest results. Documenting growth helps others learn. Every attempt improves skill. Curiosity drives progress.
20. Conclusion – Will Cherry Pits Grow
Yes, cherry pits can grow into trees with proper care. Success requires patience and correct methods. Stratification is essential. Not all seeds will sprout, but many will. The process is slow but fulfilling. For home gardeners, it’s worth trying. Growing trees from pits connects us to nature deeply.
📊 Table: Cherry Pit Growing Overview
| Stage | Requirement | Time Needed |
|---|---|---|
| Cleaning | Remove fruit flesh | One day |
| Stratification | Cold storage | Two to three months |
| Germination | Warm soil | Several weeks |
| Fruiting | Mature tree | Five to seven years |